
So here it is, my very first tutorial to share with you. Very exciting.
Just before leaving for our LA and New York holiday, I knitted a lovely winter infinity scarf to take with me using a knitting loom. Amanda and I had had a much smaller version when we were children, and I was rather surprised to see that over 20 years later they are still around. Mine cost less than $10 from my local craft store, and there were several different shapes and sizes available.
I quickly discovered however that the instructions supplied with mine had a misprint. After some trial and error I eventually figured out the technique, and thought this tutorial might be useful to other ‘first time’ loom knitters.
I loved how quick and easy it was once I got the hang of it, and the pattern is really pretty – it’s actually reversible, rather than a knit effect on one side and a purl on the other.
NOTE: In this tutorial I have used two strands of yarn simultaneously, which results in a much thicker effect. If you decide to only use one thick strand of yarn, the method is exactly the same, the only difference is instead of four loops around each peg, yours will have two.
SUPPLIES
Rectangular knitting loom
Loom hook or crochet hook
Yarn (I used 2 balls 8 ply weighing 85g each for this project)
Scissors


Step 1 – Make a slip knot and place it around peg X, leaving approx 5 inches of yarn so you can weave it back through once finished. Then take the yarn across to peg 1.

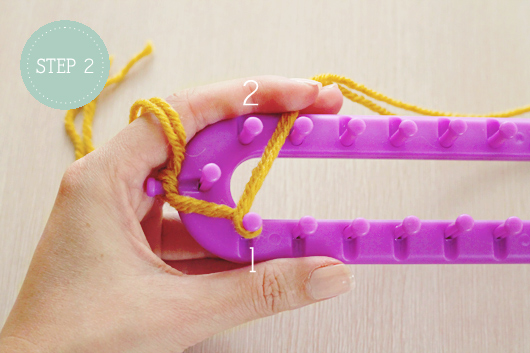
Step 2 – Wrap the yarn clockwise around peg 1 and take across to peg 2.
Step 3 – Wrap the yarn anti clockwise around peg 2 and take across to peg 3.
Continue wrapping each peg in the figure 8 pattern until you reach the desired width of your scarf. For mine I only wrapped 14 of the 18 available pegs.

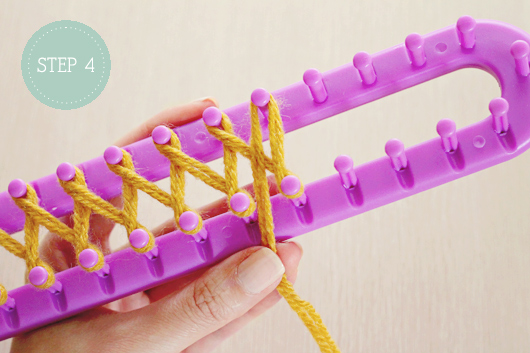
Step 4 – After wrapping the final even numbered peg, bring the yarn across to the second last odd number and hold.

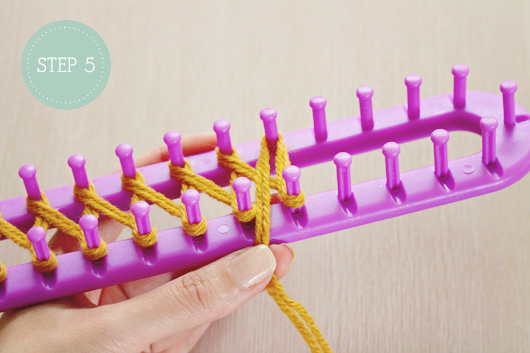
Step 5 – Push the yarn down on each wrapped peg so that the loops are at the base.

Step 6 – Wrap the yarn anti clockwise around the last odd numbered peg, creating a second loop of yarn around it. Now take across to the second last even numbered peg.
NOTE: The last even numbered peg will not have a second loop.

Step 7 – Wrap the yarn clockwise around the second last even numbered peg and take across to the second last odd numbered peg.
Continue wrapping each peg in the figure 8 pattern, working back towards the first peg.

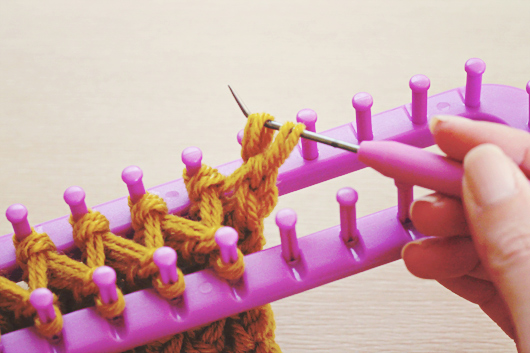
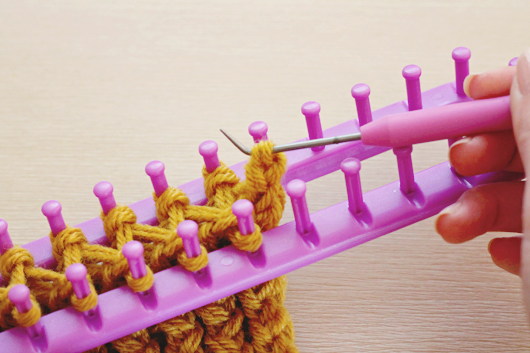
Step 8 – After wrapping peg 1, take the yarn across between peg 2 and 4 and hold.

Step 9 – Using the loom hook (mine came with the loom) or a crochet hook, lift the bottom yarn loop over the top one, working down one side of pegs and then the other. The wrapping yarn will be in your left hand, ready to begin wrapping again from left to right.

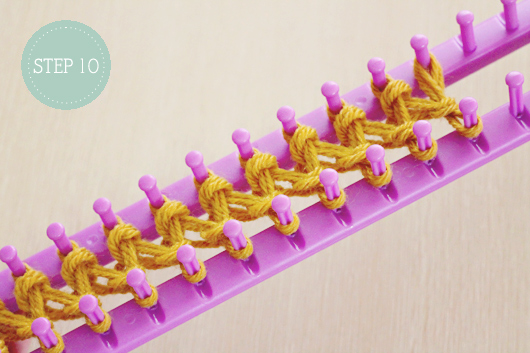
Step 10 – Push the yarn down again on each wrapped peg so the loops are at the base. This is your first row completed.
To continue the pattern simply repeat steps 3, 4, 9 and 10 to complete each row (when working from left to right as mentioned above in step 9). After a few rows you can undo the slip knot created in step 1.
To finish…
Once you have reached the desired length of your scarf (mine is approx 42 inches and a reasonably snug fit) and there is only one loop around each peg, cut the wrapping yarn off leaving a few inches. Using the loom hook (or crochet hook) start at the end opposite to the yarn tail and lift the loop off the odd numbered peg onto the crochet hook. Go to the even numbered peg and lift that loop off onto the loom hook as well.

There will now be two yarn loops on the loom hook.

Pull the first loop (closest to your hand) over the second loop.
Repeat this all the way down the loom until you reach the end. Pull the wrapping yarn through the last loop with the loom hook, pull snugly and weave the remaining yarn into the finished project. Now join the two ends with a flat seam using the same coloured yarn.
To wear, I give mine a quick twist before slipping over my head for a cozy, snug fit.
Enjoy!

FLAT SEAM HOW TO:

I LOVE this scarf and have been working on my own. I was just a little confused on how to close it up. If you could explain it a little more it would be greatly appreciated.
Hi Ashley
I’m so glad you’re making one!! They are super cozy and I’ve even bought more wool to make another one.
I understand that the finishing off part is a little complicated. It took a couple of tries before I figured it out too the first time around.
I will try to explain it some more and hope it helps you out 🙂
Thank you for this! Finishing mine up. How do you do a flat seam to join the 2 ends together?
Thanks!
Allie
That’s awesome Allie!
A flat seam simply means to join the ends of the scarf end to end with no overlapping, and then stitch them together. Use the same yarn as used to knit your scarf and you can barely even see the join at all. I’ve just posted a picture at the end of the tutorial that details it perfectly 🙂
Hi!
This is wonderful! I do not know how to knit but this makes it less scary! I was wondering if it was possible to alternate colors with this method? If so, how would you go about doing this?
Thanks Jana 🙂
I don’t consider myself to be much of a knitter either, which is one of the reasons why I enjoyed the loom so much!
I have never tried alternating colours, so I don’t have a ‘how to’ for you, but by all means you could always try using two different coloured yarns simultaneously, instead of how I used both of mine the same coloured. It could be a really nice effect actually.
If you decide to try it, I would love to hear how it goes 🙂
Is there a special size of loom to use?
Hi Anne
You can use any length loom you like, although of course using a longer loom gives you the option to knit a wider scarf. My loom is approx 11″ however as you can see I did not use all the loops.
Jana,
When you’re ready to switch colors, you simply tie the new color onto your previous working yarn, push the knot all the way down so it’s up close with the peg, and cut the previous yarn, leaving a few inches. Then, continue with your new color in the same fashion as before…as if you didn’t even change colors! Simple as that! 🙂
Ok I’m new to loom knitting and I’ve tried making this scarf with two different types of yarn and still when I start pulling the bottom loop off its very loose and looks nothing like the photo! What am I doing wrong?? 🙁
Hi Adrienne
It’s hard to know what may be happening, but just make sure to wrap the yarn quite taught (though not tight) around each loop, so the scarf doesn’t end up too slack. Hope that helps 🙂
Thank you, I will try that and thicker yarn!
I am so glad I found your post on Pinterest for this chunky scarf! I’m not the greatest knitter w/needles, and never used a loom before. So glad I gave it a try, my scarf is fabulous (if I do say so myself – tee hee) and I get compliments on it all the time!
I blogged about my results & linked to you in the post: http://www.twotendesigns.com/2013/02/pinspiration-infinity-scarf-with-flower.html
Thanks for sharing all your ideas!
Best-
Kim @ Two Ten Designs
Hi Kim
OMG, I’m so honoured that you mentioned me on your blog! And agreed…your scarf does look fabulous!
Thanks again for linking to this tutorial (still literally grinning from ear to ear like a five year old) and I can’t wait to check out your blog too 🙂
Cheers,
Nicole
Hey there… thanks for this tutorial. I recently broke my hand and cannot crochet or knit and this looks like the perfect solution. I am eager to try this out and hopefully it will be more conducive to one handedness.
Does anyone have a link to make a scarf like this but with a larger Circle shaped loom? thanks.
Hi Nicole,
What brand of loom are you using? I want to make a scarf (have never knit before) and have searched around – Knifty Knitters sound good but hard to find, Boye seems not so good, and then there is the Loops & Threads Loom Set at Michaels.
Let me know what you recommend!
Thanks,
Ayesha
Hi Ayesha
The brand I’m using is a Knifty Knitter, but any brand of loom in a similar shape and size would be fine.
Nicole xx
I am so excited! I received this loom in a bin of yarn I purchased from someone and had no idea how to use it. There was already a project started on the loom, but not being familiar with it, I just took it apart :-(. Now that I have done a little research I wish that I would have kept it. Your instructions are very easy to understand (Not quite sure I understand the finishing, but I’m a pretty much hands on person so hopefully I’ll figure it out when I get that far). Thanks for the detailed, pictured instructions. Your scarf is beautiful. I only hope mine comes out half as nice.
Hi Jai
Thank you for your lovely comments about my scarf. I’m thrilled that you’re excited about starting one yourself. The loom really makes the knitting process quick and easy, which I love because my technique is not that great when using regular needles.
Would love to see a photo of the fiinshed project. Good luck with it.
Nicole xx
I’m having the same issue as one of the other commenters. I’m not too clear on how to remove (& close) the scarf once I’ve knitted the length that I desire.
Hi Kristina
I found it a little tricky at first myself too, but don’t worry it becomes easy once you’ve had a little practice. There’s a video tutorial on youtube that shows the technique quite well which might be helpful to you, here’s the link https://www.youtube.com/watch?v=Dpc2vtE0XU8
Good luck, would love to see a picture of your finsihed scarf 🙂
Nicole xx
Do you have a video of the process. I’m not to good at following written directions
Hi Beth
Unfortunately I don’t have a video of the process, however I believe there are a few on youtube showing several techniques which you may find helpful.
Nicole xx